It is officially spring. While it’s not the actual vernal equinox (that’s still a couple of weeks away); I know it’s spring because when I walked into the farm store last week the undeniable sound of chicks “peeping” could be heard. And to me, that is a true sound of spring.
Yes, chicks are here again. If you have been mesmerized and tantalized by those tiny fuzzballs, and are ready to make the leap to backyard chicken raising (or restocking your flock), here are a few tips for successful chick rearing.
On Your Mark…
If this is your first foray into chickens, read this CdA Coop post: A Primer for Backyard Chickens. It will help you sort through some important details before you commit. I recommend reading this first, because once you are at the farm store, staring down at those fluffy peeps, well, you’ll come home with a box of chicks.
Get Set…
If chicks are indeed in your future, the next step is setting up your “nursery.” It’s a good idea to have everything ready to go when you bring your babies home. Just like a newborn, chicks have their own special requirements to grow into productive hens.
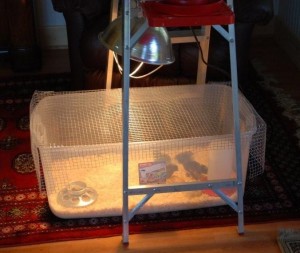
We use a clear plastic bin with a hardware wire covering as our brooder. This works for up to six chicks.
The Brooder. This is where your chicks will spend the next four to five weeks, so you’ll want something that is large enough to contain your chicks as they grow (and they grow at an amazing rate).
Commercial brooders and pens are available, or you can make your own. The size of the brooder will depend on the number of chicks. We use a large, clear plastic bin with a hardware wire cover — this works well for up to six chicks.
Line the bottom of your brooder with three to four inches of pine shavings–not cedar shavings. The aromatic oils in cedar will irritate your chicks’ lungs, making them susceptible to respiratory problems later in life. Shaving will help absorb droppings and odors.
Heat Lamp. A heat lamp is also necessary to keep chicks warm. The temperature in the brooder should be about 90 to 95 degrees the first week. As the chicks grow, the lamp should be raised, as their need for “extra-warmth” decreases.
| Approximate Heat Needs by Chick Age | |
| Week 1 | 90 – 95° |
| Week 2 | 85 – 90° |
| Week 3 | 80 – 85° |
| Week 4 | 75 – 80° |
| Week 5, 6, 7 | 70 – 75° |
We keep our chicks in the house for the first three to four weeks — it’s dusty — but it keeps them safe and warm. If chicks in the house is out of the question, placing the brooder in a garage or other enclosed shelter is fine — as long as they are away from drafts and have the warmth they need.
Feed. A good quality chick starter feed (feed that is specially formulated for growing chicks) is required. This is usually found as a crumble or mash formula. Starter feed should be fed until your chicks are about 20 weeks old or when they start laying eggs. Do not feed chicks a feed formulated for layers, as it contains high levels of calcium that can be toxic to chicks.
A small chick feeder, slightly elevated, will keep feed clean, although you will find your chicks standing on top (or in some cases, inside!!) the feeder. Using an open dish is not recommended. The same applies to the water container–it should not be an open dish. Small feed and water containers designed for brooders are widely available.
Chicks will also need grit. Since chickens don’t have teeth, they need grit to help breakdown food. Commercial chick grit is available at feed stores and should be offered free choice in the brooder.
There are lots of treats that can be offered — meal worms, baby-cakes, and even free-ranging on grass. These should be offered with supervision when chicks are over two weeks old.
…Go!
Now that you have your supplies ready to go, it’s time to decide which breed(s) are best for your situation/climate. MyPetChicken.com has a nice selection tool to get you started. Here you can choose traits like egg color, cold hardiness, temperament, and egg laying rates. Checking with the local farm store or supplier is also a good idea to see what is available.
Selecting Chicks. Unless you are ordering chicks from a supplier (such as Murray McMurray) you should observe the chicks before choosing. Look for chicks that are active, eats and drinks. You want a robust chick that shows vitality.
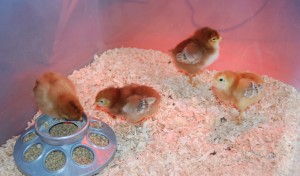 Don’t mistake a chick that suddenly falls over asleep for an ill bird–this is normal chick behavior. It takes lots of energy to be a chick and a sudden face-plant is just nature’s way of saying “nap-time.” They wake up just as fast as crashing, and resume their activity.
Bringing Baby Home. Bring you chicks home immediately — no running errands or stopping off for lunch! Place your chicks in their brooder and let them settle a few minutes. It’s critical that your chicks drink, so I take each chick and dunk its beak in the waterer — they get the hint. Chicks need water and you want to make certain they know where to find it.
Pasty Butt. Doo-doo happens and sometimes it sticks! This condition, known as pasty butt, is when dropping stick the the feathers around the chick’s vent. It is usually happens when a chick is stressed or chilled. While it’s not life threatening, you will need to clean the back end. A little warm water on a paper towel or soft cloth will do the trick. Keep an eye on the chick, as multiple cleanings may be in order over the next week or until the chick is able to tend to itself.
Now, let them be. Your chicks have had a big day, so give them time to adjust. Once everyone is settled, eating and drinking, you can handle them…gently and often for best socializing results.
Growing Up and Out. At week four, my chicks move from the brooder in the house to their temporary coop outside. The heat lamp goes with them until they are old enough and/or ambient temperatures are warm enough to do without.
Depending on weather conditions, you can allow your chicks free run in an enclosed pen by week 5. I usually prop the coop door open so they can come and go during the day, and close them in the coop at night.
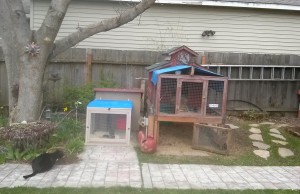
Since I have an existing flock, the “chick condo” is set up next to the main coop, so that when the time comes, everyone can get a good look at each behind the safety of hardware wire.
Do not put chicks or pullets directly into an existing flock, or you’ll be back at the farm store buying more chicks. No kidding.
Becoming a Flock. Integrating pullets into an existing flock takes time and patience. The approach that has worked best for me is 1) set up the side-by-side coops, and 2) slowly begin to introduce the pullets to hens in an enclosed pen for a few minutes each day.
This will be my fourth time at integrating a flock…the first was a disaster (read about it here and here), but last two have gone smoothly. Here are a few previous posts that cover flock integration: Getting to Know You and Sweet 16.
Keep you chicks happy and healthy and in 20 to 24 weeks time, you’ll find your first eggs in the nest! Really, what other pet makes you breakfast??



Leave a Reply