Starting Heirloom Tomatoes from Seed is Easy!
Note: This article was originally posted March 18, 2013. The links have been updated for 2014.
Last week I started 25 varieties of heirloom tomato plants from seed; planting more than 500 seeds! It would appear that I have a problem controlling myself, but after last year’s success at selling heirloom tomato plants at the Kootenai 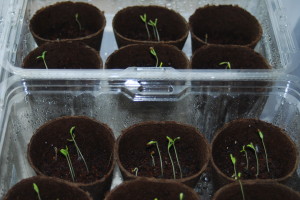 County Farmers’ Market, I’m going to offer plants for sale again (click here for 2014 Tomato List).
Growing heirloom tomato plants from seed is fairly simple, and I love the anticipation of seeing the first tiny sprouts appear. So grab a packet of heirloom tomato seeds and let’s get planting!
Getting Started
Timing Is Everything. It’s a good idea to start your tomato seeds about 8 weeks before the last average day of frost (May 15th in northern Idaho). Anytime within the next three weeks is prime-time to start your seeds.

A plastic shoebox, turned upside down, becomes a mini-greenhouse.
Gathering Supplies. Retailers and seed catalogs would like you to think that you need expensive equipment (heating mats, grow-lights, prepackaged kits, etc.) to successfully start seeds. Not so. All you really need is a sunny window, quality seed-starting mix, and some up-cycling ingenuity! Of course, if you don’t have a sunny window, a grow light will come in handy, but chances are you have a window that will work for at least a couple of pots of seeds.
Ground coconut husks can be used in place of peat.
The Scoop on the Dirt. For best results use a commercial seed-starting mix or mix your own. Soil from your garden is a no-no — it’s just too heavy. Commercial mixes are generally a combination of sphagnum peat moss mixed with perlite or vermiculite. Some mixes contain a wetting agent and/or fertilizer. I use a mix of peat and perlite (about 5 parts peat to 1 part perlite). Another option is coconut coir (ground coconut husks). Burpee sells dehydrated blocks of coco-coir which expands to 8 quarts of material when water is added. I add one block to 8 quarts of mix. Unless you are planning to start mass quantities of seeds, one bag of seed mix (8 to 10 quarts) is all you will probably need.

Using newspaper to make pots.
Pots. There is no limit as to what you can grow your seeds in. A quick look around the house will reveal lots of options: paper cups, egg cartons, paper milk cartons, or cardboard rolls from paper towels and toilet paper. There’s even a nifty little pot maker you can purchase to make pots out of newspaper. Intriguing, but I don’t have time to make my own pots. I use 3″ peat pots, and I don’t recommend using anything smaller.
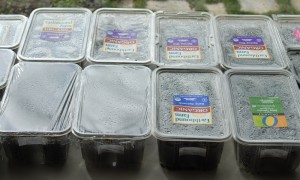
Recycled lettuce containers make perfect mini-greenhouses for seed germination.
Mini Green Houses. Tomato seeds need a warm, moist environment to germinate. Again, no need to purchase a seed-starting kit. All you need is a plastic lettuce container (or any waterproof container that is deep enough to hold your pots with a little head room). Nestle the pots in the container, pop on the lid, and viola!, a perfect mini-greenhouse. No lid? No problem, stretch a piece of plastic wrap over the top and secure with a large rubber band. The lid is only needed until the seeds germinate, then it can be removed.
Planting Seeds
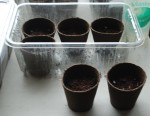
Well moistened peat pots planted with 5 seeds in each.
With your supplies gathered, it’s time to plant. I’ve been using this method for several years with great success.
- Wet your peat pots with warm water. I make sure they are well saturated. (I don’t wet my soil before planting. However, you are not using peat pots, you will want to dampen your soil — don’t make it soggy!)
- Fill the peat pots about 2/3 full of seed-starting mix. Don’t compact the soil, but lightly press down. Using a spray bottle, spray warm water on the soil in the pot to moisten.
- Place your seeds on the moisten mix. I place 5 seeds in each pot and transplant the starts into individual pots later.
- Spray the seeds with water just to dampen.
- Cover the seeds with about 1/4 inch of seed-starting mix and spray the soil again.
- Place the lid on your container and put it in a warm, sunny spot.
- In 7 days your tomatoes will sprout!
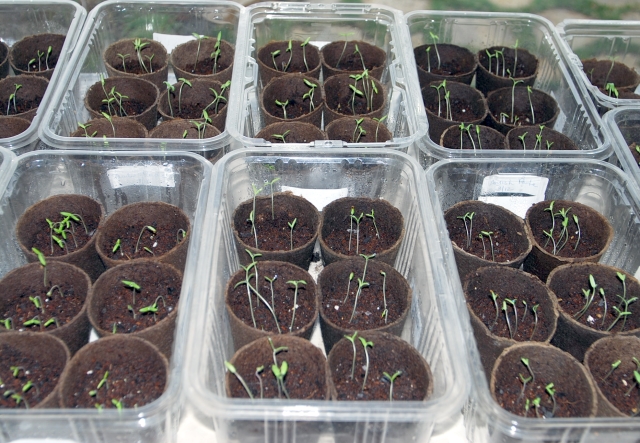
Heirloom tomato seedlings take about 7 days to germinate. The seed above were planted on March 11…on March 16 the soil was still bare. As if by magic, the seedlings appeared overnight and greeted me on March 17.
And that’s just how easy it is! Once your seed germinate, you can remove the container cover or prop it open. If the seedlings start to touch the lid, you will need to remove it. Don’t let your pots dry out — keep them moist, but not soppy-wet. The seedlings do require daily monitoring of moisture levels. When your seedlings develop their first set of true leaves, (about 3 weeks after seed starting), they will be ready to transplant into individual pots (one plant per pot).
Of course, if you don’t want to grow your own, I’ll have plenty of heirloom tomato plants for sale by the middle of May!
What types of heirloom tomatoes are your starting this year? Let me know in the comments below.


Yeah sun is out and the chickens are laying again. Off I went rather optimistically to buy “dirt” and dug out all of the small food/yogurt pots I have been saving all winter……saw your post and yes it is time!
Eerrr snow forecast for tomorrow……….where is global warming when you need it??
(on the bright side – I am still eating the cherry tomatoes from my freezer, from last year)
Clair
Ah yes, it really wouldn’t be the first day of spring without a little snow, now would it? We gave the girls a break last fall to molt, but they’ve been laying since early December — can’t believe Helen will be five this year; Madge will be four! Keep me posted on how the garden is doing! — Candace
The Black Prince tomatoes from last year were so flavorful. They were great oven dried with fresh Chèvre goat cheese from the farmers market.
Looking forward to more this year.
David
Hi David — What a delicious idea…of course I think everything is delicious with Chevre! The Black Prince is one of my favorites too! Great taste and the perfect size. I’ll have those for sale again this year. 🙂 Candace
Thanks for your wonderful and informative article! I’m excited to start gardening!
Is it too late to plant seeds? 😮
Corine
Hi Corine, It’s not too late to start your tomato plants from seed, but you may end up transplanting smaller plants into the ground. Given the unpredictable weather in north Idaho, planting around June 1st might be in order for everyone. Typically it is best to start seeds about 8 weeks before the last average day of frost (May 15 for north Idaho), but later starts can catch up and be productive. Glad you found the article informative and thanks for reading! — Candace
Hi Candace,
I found your article informative and useful. So I gather that seeds should be started in April??
Thanks again
Jerry
Hi Jerry,
Tomatoes, peppers, eggplant and other “hot” season vegetables should be started indoors about 8 weeks before the last average frost.In northern Idaho, that usually equates to starting seeds indoors around March 15th. Our last average day of frost is around May 15th. You want to be able to plant your tomato plants when nighttime temps are above 50 degrees — which is usually the case by mid-May. Depending on the year, I may plant earlier in May or if it’s a wet, cold spring, closer to June. Thanks for reading The Coeur d’Alene Coop blog! — Candace